LUUM.IO
SENSOR1 - INSTALL GUIDE#
Introduction#
About This Guide#
This guide provides instructions for installing the Sensor1, an Amatis wireless environmental sensor. In addition to the step-by-step installation process, this guide provides instructions on how to configure the Sensor1, as well as some basic troubleshooting steps.
Product Overview#
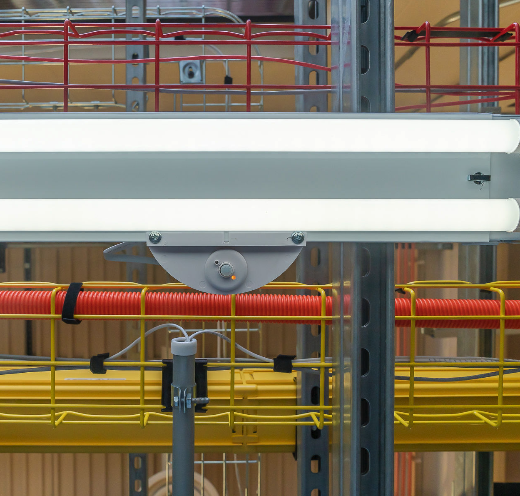
The Sensor1 is a wireless environmental sensor, capable of sensing occupancy, light levels, temperature, and humidity. It connects to wireless networks via the Amatis Border Router (AMBR).
- Occupancy and vacancy detection.
- Light level monitoring for daylight harvesting applications.
- Temperature and humidity sensing for data collection.
- Cloud connection via AMBR, uploading real-time data from your site to the Amatis config app.
Installation#
Parts List#
Before getting started with the installation process, it's important to make sure all the necessary components are included. Here's what should be found inside the box:
- (1) Sensor1
- (4) Sensor Blinders
Placement#
Follow these guidelines when deciding on where to install the Sensor1:
- The Sensor1 should be installed so it has a clear line of sight to the area it is monitoring.
- Avoid installing the Sensor1 near moving machinery, air vents, or fans, which could trigger false detections.
- Ensure the Sensor1's height is appropriate for the area needing coverage to avoid blind spots or unnecessary coverage outside the desired area.
Mounting Height#
| Device | Recommended Mounting Height | Detection Area |
|---|---|---|
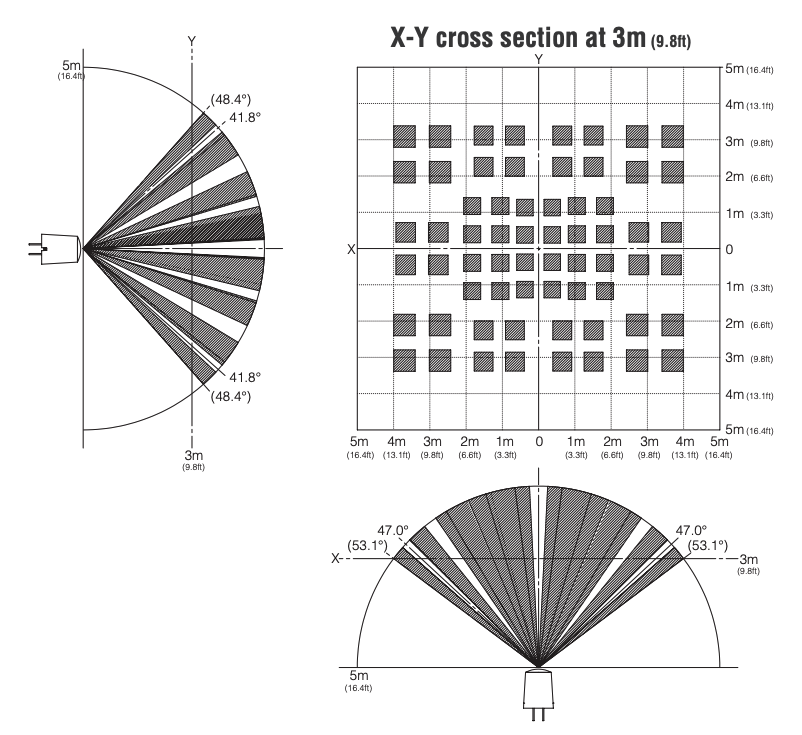
| Sensor1 | 3m (9.8ft) | ~8m (26.2ft) L x 7m (23ft) W Rectangle |
| Sensor1 High Bay | 12m (39.4ft) | ~16m (52.4ft) Diameter Circle |
Sensor1 Detection Area
Note
The lower the sensor is, the smaller the detection region will be. This sensor can be mounted higher than the recommended mounting height, but detection will start to be lost near the edges of the detection area.
Sensor1 High Bay Detection Area

Note
The lower the sensor is, the smaller the detection region will be. This sensor cannot be mounted any higher than the recommended mounting height.
-
The Sensor1 should be installed within 200' of an AMBR or other wireless node.
Distance Limitations
The Amatis system supports communication ranges up to 200' (does not apply to wall switches) with a clear line of site. Obstacles such as walls or floors will impact the communication ranges significantly.
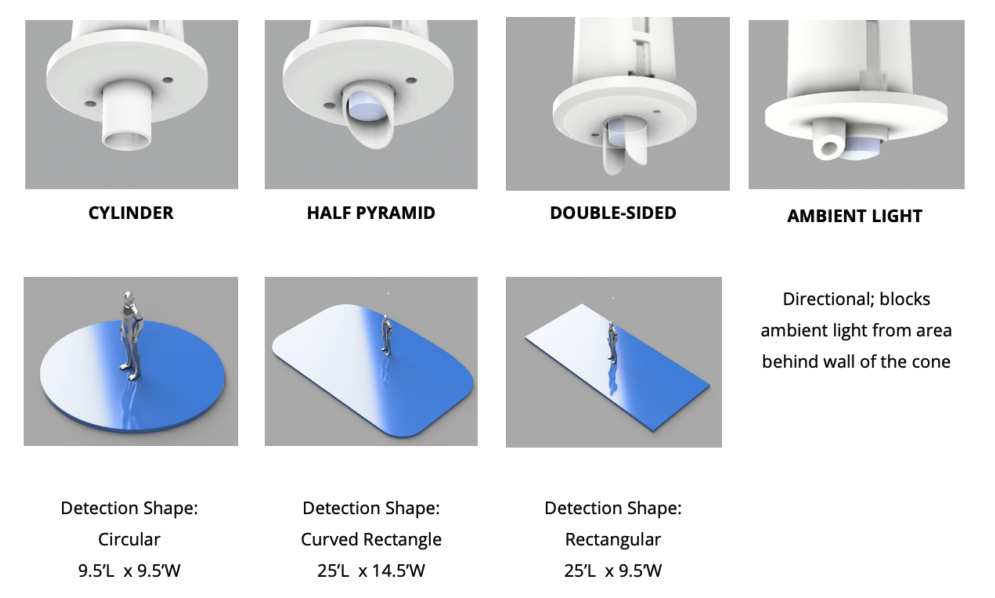
Sensor Blinders#
The Sensor1 comes with blinders to mask areas that should be ignored by the sensor. Install and adjust the blinders to cover areas such as doorways or windows if you want to exclude traffic or external movements.
Wiring#
The Sensor1 has two wires for a low voltage 24V DC input.
Note
The input wires are polarity protected, either can be positive or negative.
Labeling & MAC Capture#
After installing any Amatis wireless device, it is imperative to note the device ID with the associated load/fixture/device. This is how the devices will be identified in the programmed. It is also a good idea to label any Amatis load controllers with the load they are controlling.
Note
The device ID can be found on the device’s packaging or the device itself.
Initial Setup#
Necessary Parts#
Review the following list to ensure all necessary parts are available:
- An active AMBR within communication range of the Sensor1.
- Active power to the Sensor1.
Device Configuration#
Perform the following steps to configure the device:
- Open up the Amatis App and navigate to the site.
- Open the Devices table and ensure a device with the ID noted in the previous step is active.
The device is now ready to be added to a location and programmed with the Amatis App.
Updating Firmware#
Perform the following steps to update the device's firmware:
- Open up the Amatis App and navigate to the site.
- Open the Devices table and find the device to be updated.
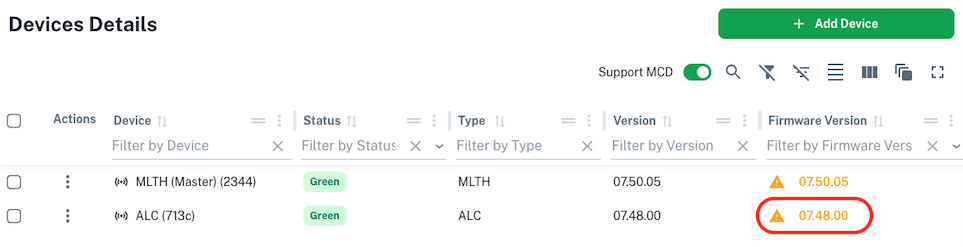
- Make sure the "Firmware Version" column is visible. If the firmware is out of date, it will show a yellow alert and yellow text.
-
Click on the out of date firmware to request a firmware update.
Note
Depending on how out of date the firmware is, the programming may need to be synced to the devices after a firmware update.
Related Information#
Basic Troubleshooting#
Perform the following steps for basic troubleshooting of the device:
- Verify the device is operating normally using the LED Troubleshooting Matrix below.
- Verify the sensor is detecting motion by looking at the LED while moving underneath it.
- Power cycle the device by turning off the low voltage source, and turning it back on 30 seconds later.
LED Indicator Troubleshooting#
Use the following table to troubleshoot specific issues with the device based on the LED indicators:
| LED Troubleshooting Matrix | |||
|---|---|---|---|
| LED Color | SOLID | FLASHING | OFF |
| Green | Device communicating normally, no motion detected | n/a | No power to device |
| Orange | Device communicating normally, motion detected | n/a | No power to device |
| Green/Orange | n/a | FAST: Device is booting SLOW: Device unable to communicate with an AMBR |
No power to device |
Normal Operation
BOLD description indicates normal operation.
Technical Support#
If you experience any issues during installation or operation of this product, please contact our technical support team for assistance. Our technical support team is available via email at support@amatiscontrols.com. Please provide a detailed description of the issue you are experiencing, including any error messages or other relevant information.
Warranty#
All Amatis LED lighting products and controls come with a 5-year parts warranty, as well as labor per product up to a maximum of 50% of the material price for parts being replaced*. All parts are UL certified. Lamps are DLC certified, therefore eligible for utility incentives. We warrant that our products will be free from defects in material and workmanship for a 5-year period from the date of purchase. Defective products under warranty will be replaced with an equal or higher quality product.
Internet Connection
The Amatis Border Router (AMBR) connected to your affected device must have remained connected to the Amatis cloud via the Internet or cellular connection from the start of site commissioning to date of return request. Non-connected systems are eligible for a 2-year limited warranty (730 days) from shipment date, with the same remaining criteria.
Contacts#
Luum.io Headquarters
625 Kenmoor Ave STE 350
PMB 51933
Grand Rapids, MI. 49546
Phone: +1 (313) 314-3617
Document Feedback#
While we have taken great care to ensure the accuracy and completeness of this document, we welcome your feedback and suggestions to further improve it. If you notice any errors or omissions or feel that a topic could benefit from further explanation, please let us know by emailing your feedback to support@amatiscontrols.io. Your input is valuable to us and will help us enhance the quality and usefulness of our documentation.
Disclaimer#
All rights, title, and interest in and to this manual, including without limitation all copyright, trademark, patent, trade secret, and other proprietary rights, belong solely and exclusively to Luum.io and/or its licensors. This manual is provided solely for the purpose of assisting in the installation and operation of the device, and no license or other rights are granted or implied hereby. No part of this manual may be reproduced, distributed, or transmitted in any form or by any means, including photocopying, recording, or other electronic or mechanical methods, without the prior written permission of Luum.io. The contents of this manual are subject to change without notice. The information contained herein is provided on an 'as is' basis and is for informational purposes only. Luum.io makes no warranty, express or implied, as to the accuracy, completeness, or usefulness of this information, nor does it assume any legal liability or responsibility for the consequences of any errors or omissions therein. The names of actual companies and products mentioned herein may be the trademarks of their respective owners.