LUUM.IO
AMATIS - MULTI-AMBR CONFIGURATION GUIDE#
About This Guide#
This guide is tailored for setting up multi-AMBR (Amatis Border Router) lighting control systems, essential in large-scale installations where a single AMBR's capacity (up to 100 devices) is exceeded. It outlines the process of installing multiple AMBRs, configuring network profiles, organizing devices into groups, and ensuring efficient network communication. Additionally, it covers the syncing of devices to their profiles, troubleshooting, and the essential steps for managing complex lighting networks. This guide aims to equip you with the knowledge to effectively manage and maintain a robust Amatis lighting control system.
Necessary Parts#
The following parts will be necessary to complete this guide:
- A functional IP network
- Three or more Amatis Border Routers (AMBRs) on the default network profile
- Several Amatis wireless devices on the default network profile
Default Network Profile
All AMBRs and wireless devices will be shipped on the default network profile.
System Setup#
Before getting started with the multi-AMBR site configuration, ensure all devices are properly connected. The main AMBR and all child AMBRs should have power and be connected to the same network. All wireless controls should also be powered. Once all devices have power and are visible in the configuration app, the configuration process can begin.
Step 1: Design#
In larger installations, where the number of lighting control devices exceeds the capacity of a single AMBR (up to 100 devices), it's crucial to implement a system of AMBRs. Each AMBR manages a group of devices, with each group containing fewer than 100 devices due to the AMBR's capacity limit. An additional AMBR must also be placed anywhere on the site. This is the "Main" AMBR, and will not communicate with any wireless devices.
AMBR Placement Strategy#
Based on the locations of the wireless lighting controls, divide the site into device groups. Each group should ideally contain a number of devices that can be effectively managed by a single AMBR (less than 100). Identify the best locations to place AMBRs within each group. These locations should be central to the devices they will manage, considering factors like signal range (ideally within 50 feet of the devices) and potential signal obstructions.
3rd Party Installation
If a 3rd party, such as an electrical contractor, will be installing the lighting controls and AMBRs, it is important to communicate the locations of the AMBRs early on so that the proper wiring can be ran to the AMBR locations.
Step 2: AMBR Configuration#
Main AMBR#
-
In the configuration app, load the site for the designated Main AMBR. If a site has not been created yet, create a site for the designated Main AMBR.
-
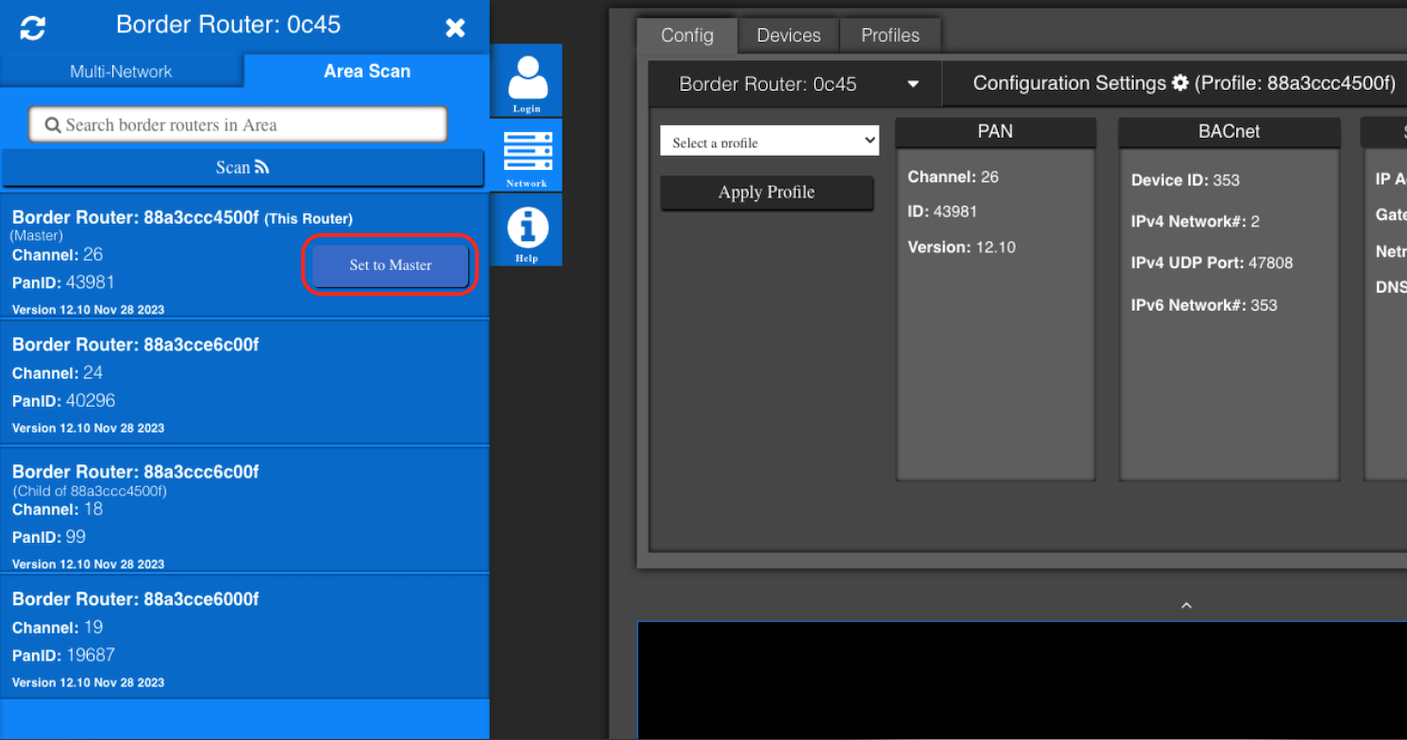
Navigate to the "AMBRs" tab of the site. Open the "Actions" menu for the Main AMBR and select "Set To Main AMBR".
Child AMBR Assignments#
-
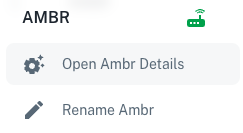
Open the "Actions" menu for the Main AMBR and select "Open AMBR Details".
-
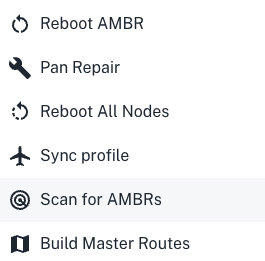
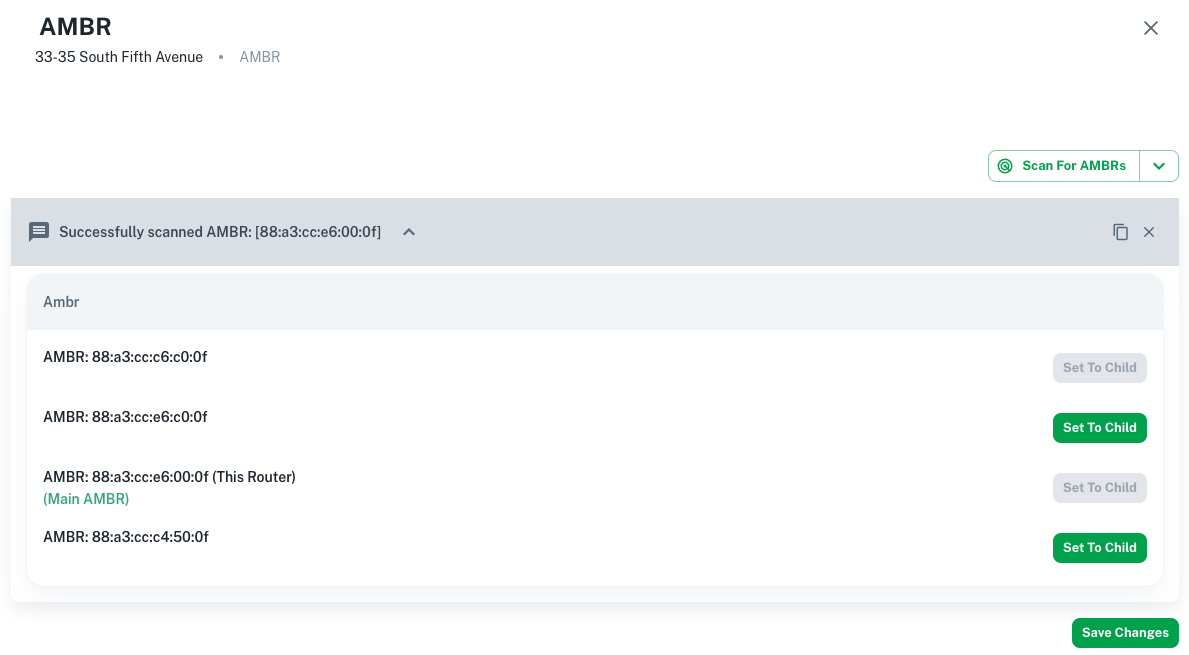
Open the options dropdown and select "Scan For AMBRs".

-
Once the scan has completed, select "Set to Child" on all AMBRs designated as children, then select "Save Changes".
Step 3: Create Network Profiles#
A network profile is a unique configuration that allows an AMBR to establish its own separate network segment and ensures efficient communication within a specific group of devices. Each AMBR requires its own unique network profile, which involves setting specific channel (CHAN) and Personal Area Network Identifier (PAN) parameters.
Network Profiles Table#
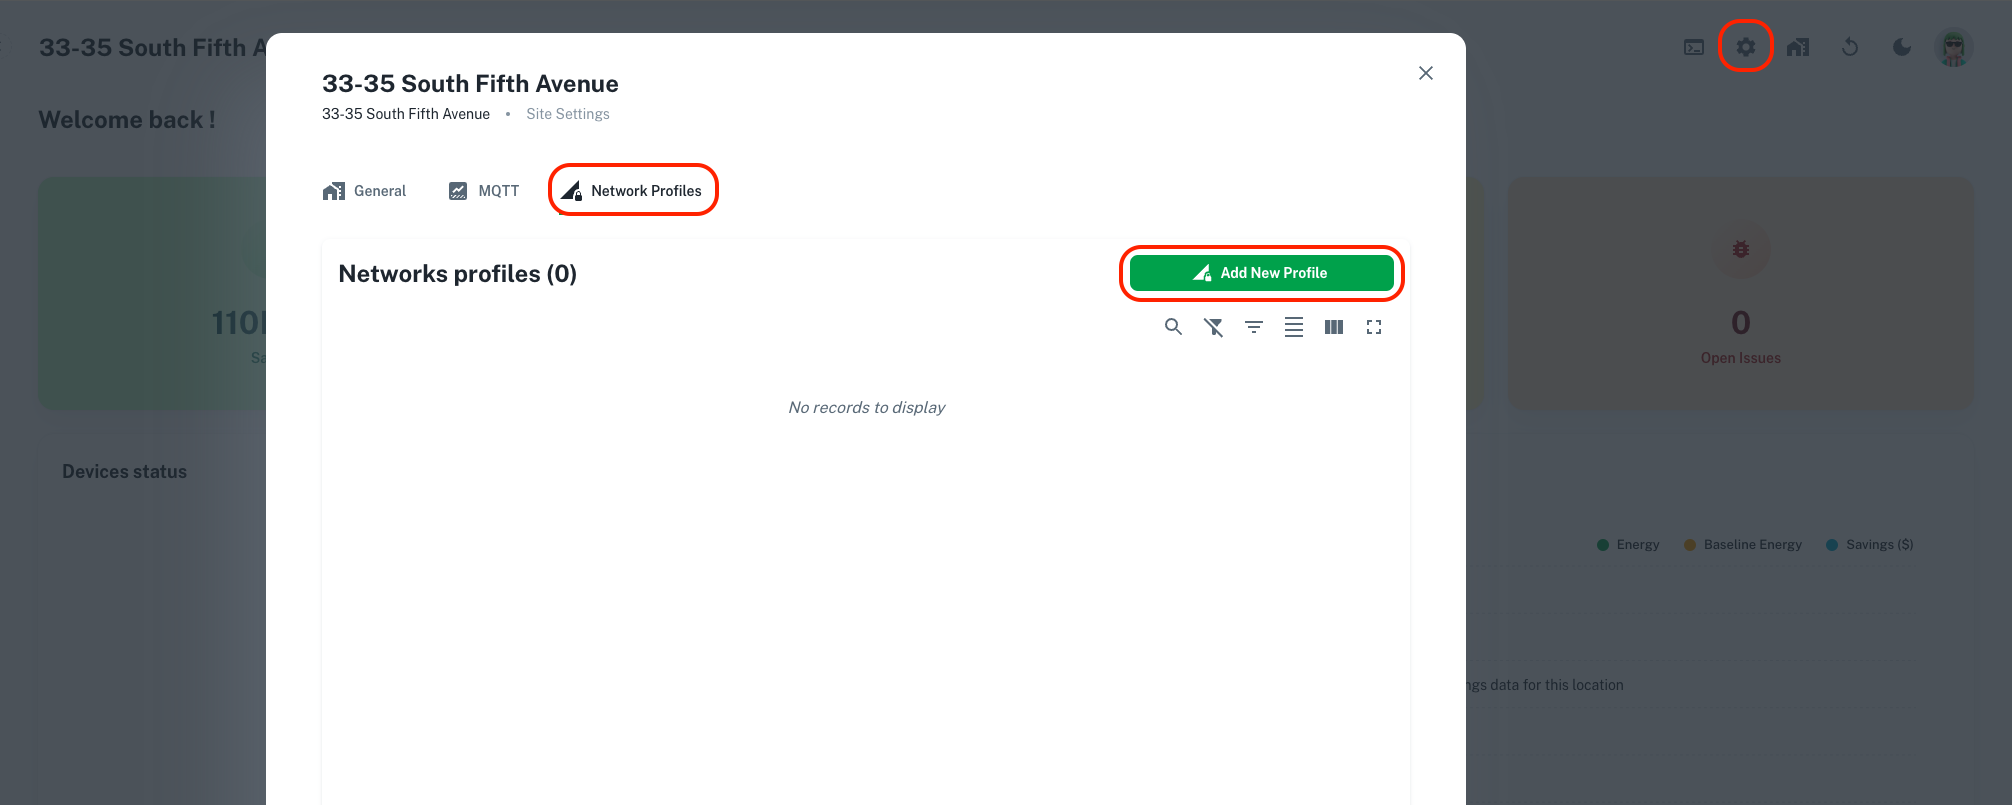
Select the site settings gear in the top right part of the configuration app. In the settings menu, select "Network Profiles", then select "Add New Profile".
Network Profile Creation#
Make a unique network profile for every AMBR. Name the network profile and add a description. Assign the profile a unique combination of CHAN and PAN ID. Additionally, create a profile for the main AMBR using the default profile values (CHAN 26, PAN 43981).
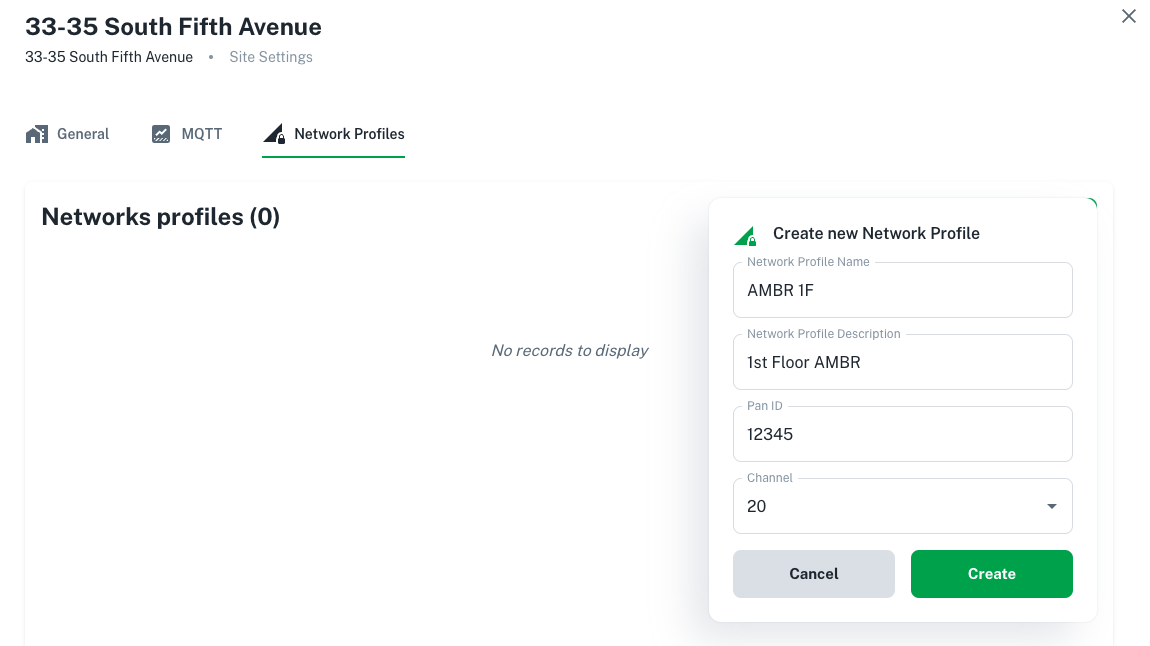
Channel & PanID
CHAN values must be within 13-24, excluding 14, 18, or 22. PAN ID must be within 1-65535.
Step 4: Assigning Devices To Profiles#
Once the network profiles have been created for each AMBR, the next step is to assign these profiles to the devices. Each lighting control device needs to be configured to align with the network profile of the AMBR it is intended to communicate with. Properly assigning profiles guarantees that each device operates within its designated network segment, thus maintaining the system's organization and preventing cross-network interference.
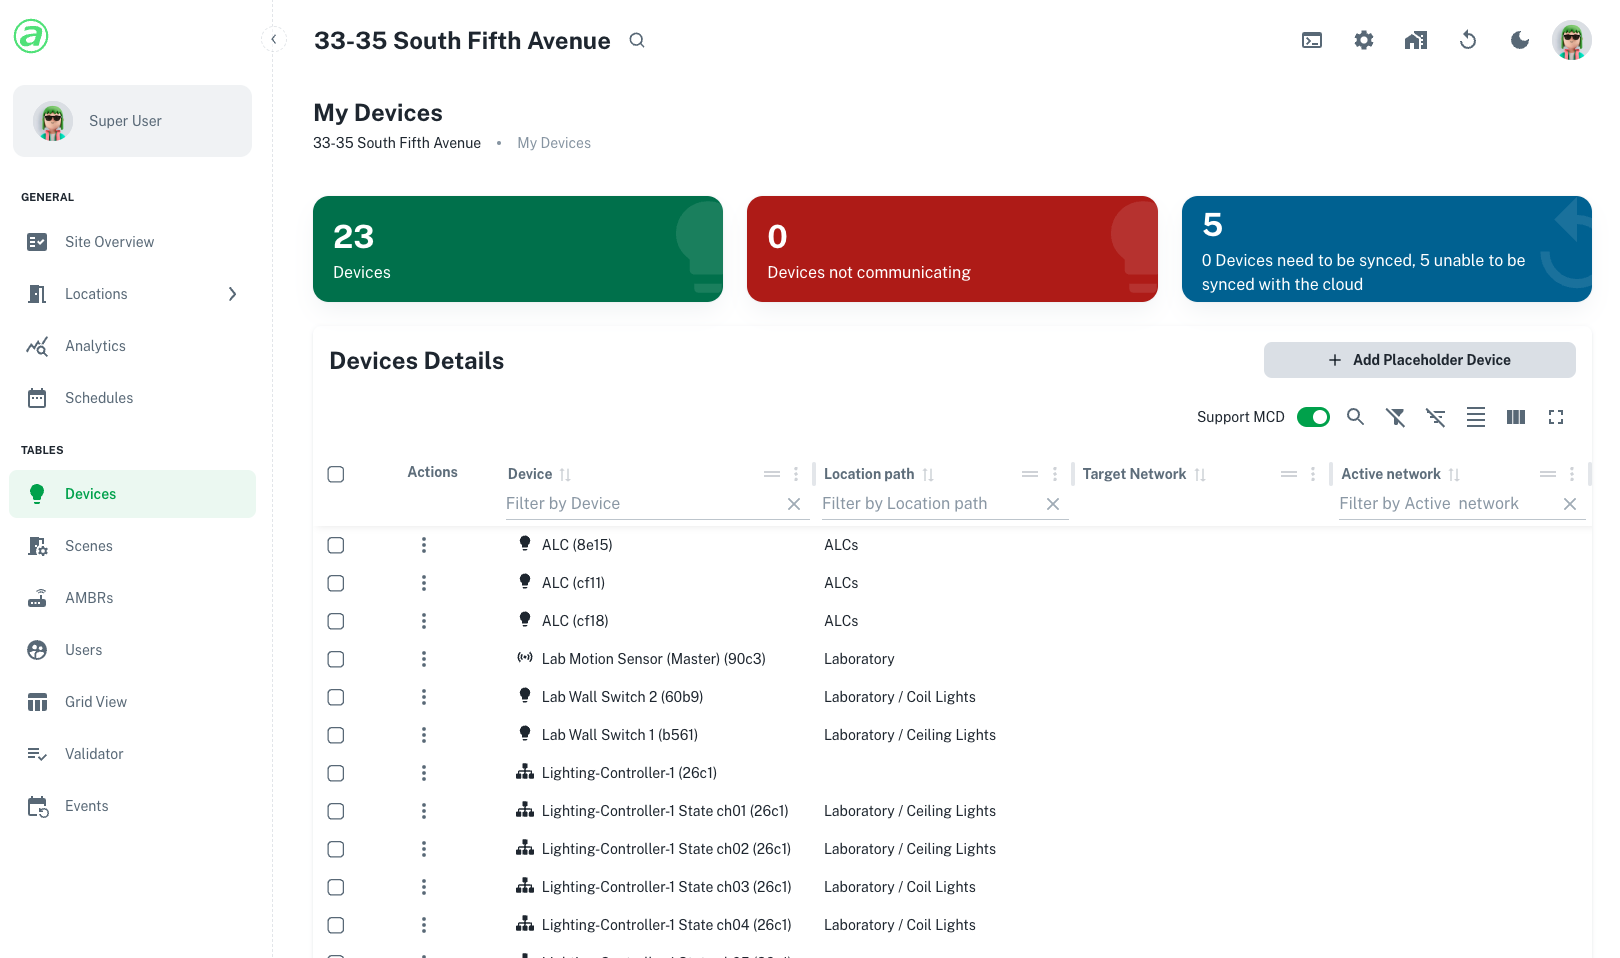
Device & Profile Selection#
In the main device table, or in the device table of a location, select a device or group of devices to apply a network profile to. In the "Target Network" column, select the assigned network profile for the devices.
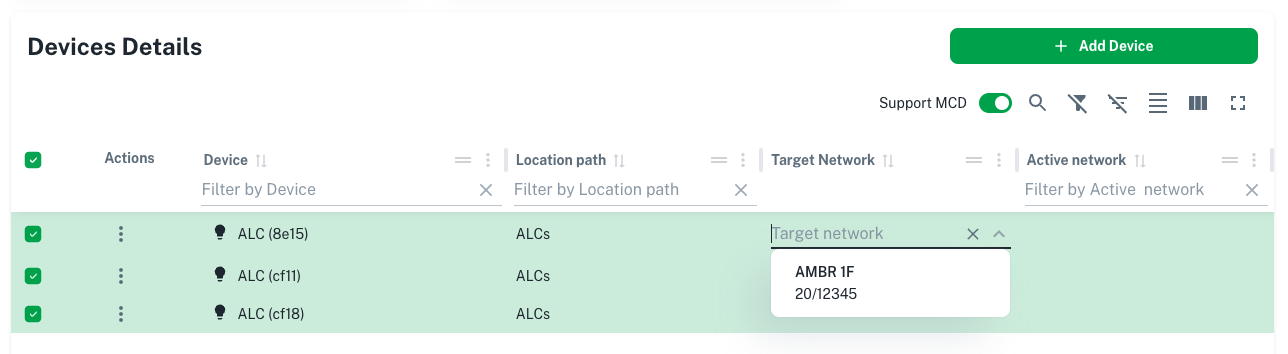
Multiple Devices
If multiple devices are selected, a confirmation window will open asking to confirm this profile should be applied to multiple devices.
Cross-AMBR (XA) Scenes
It is best practice to ensure all the devices in any location are all on the same network profile, communicating to the same AMBR. In some cases, this will not be possible. If the local network goes down, and AMBRs cannot communicate with each other, XA scenes will not function.
Moving Devices To Target Network#
Once all the devices have been assigned a target network, they need to be moved to their target network. It is best to do this all at once. In the main device window, select all the devices. In the action menu at the bottom of the screen, select "Multicast Profiles & Reboot".
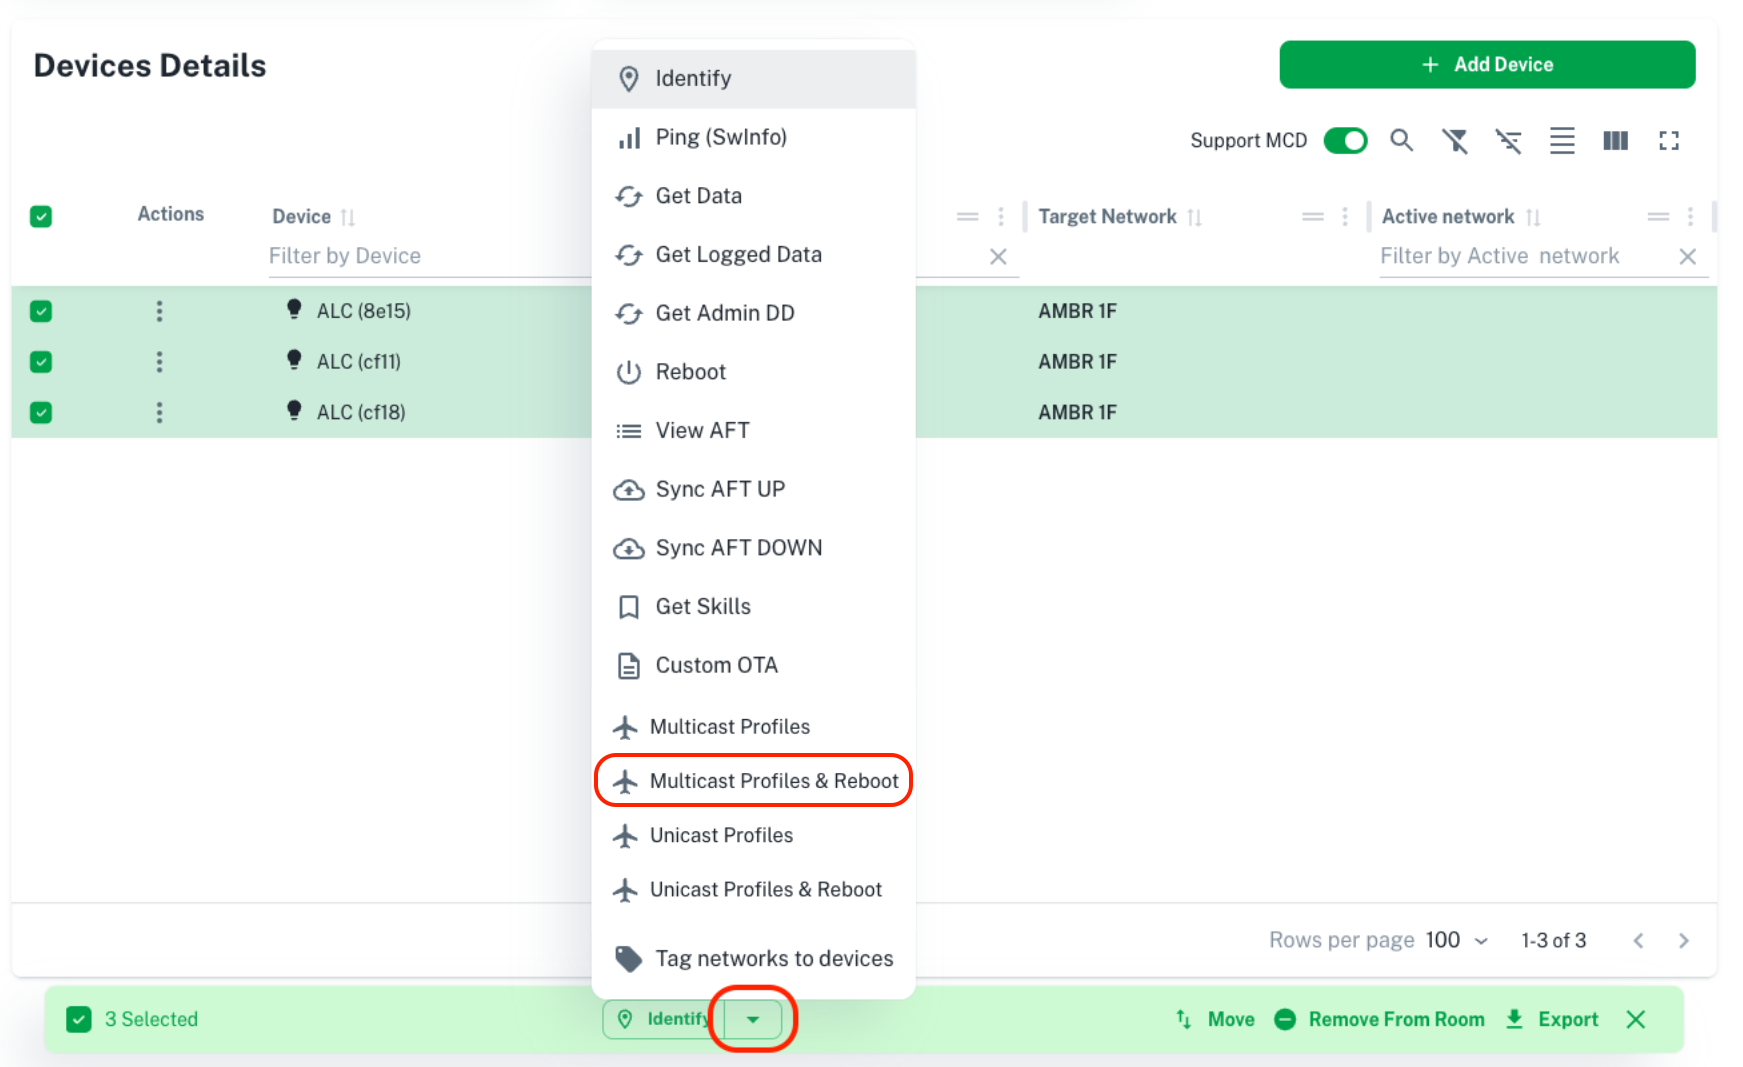
This will send a command to every device to move from the default profile they shipped on, to the target profile they were assigned. This may take a few minutes if there are a lot of devices to move. Responses to the move calls will stop flowing in once all devices have been instructed to move.
Duplicate Last 4 MACs
Devices are referenced by the last four digits of their MAC address. It is possible to have devices with the same last four on a site. Any devices with duplicate last fours should use the "Unicast Profiles & Reboot" command before using the "Multicast Profiles & Reboot" command on all the other devices.
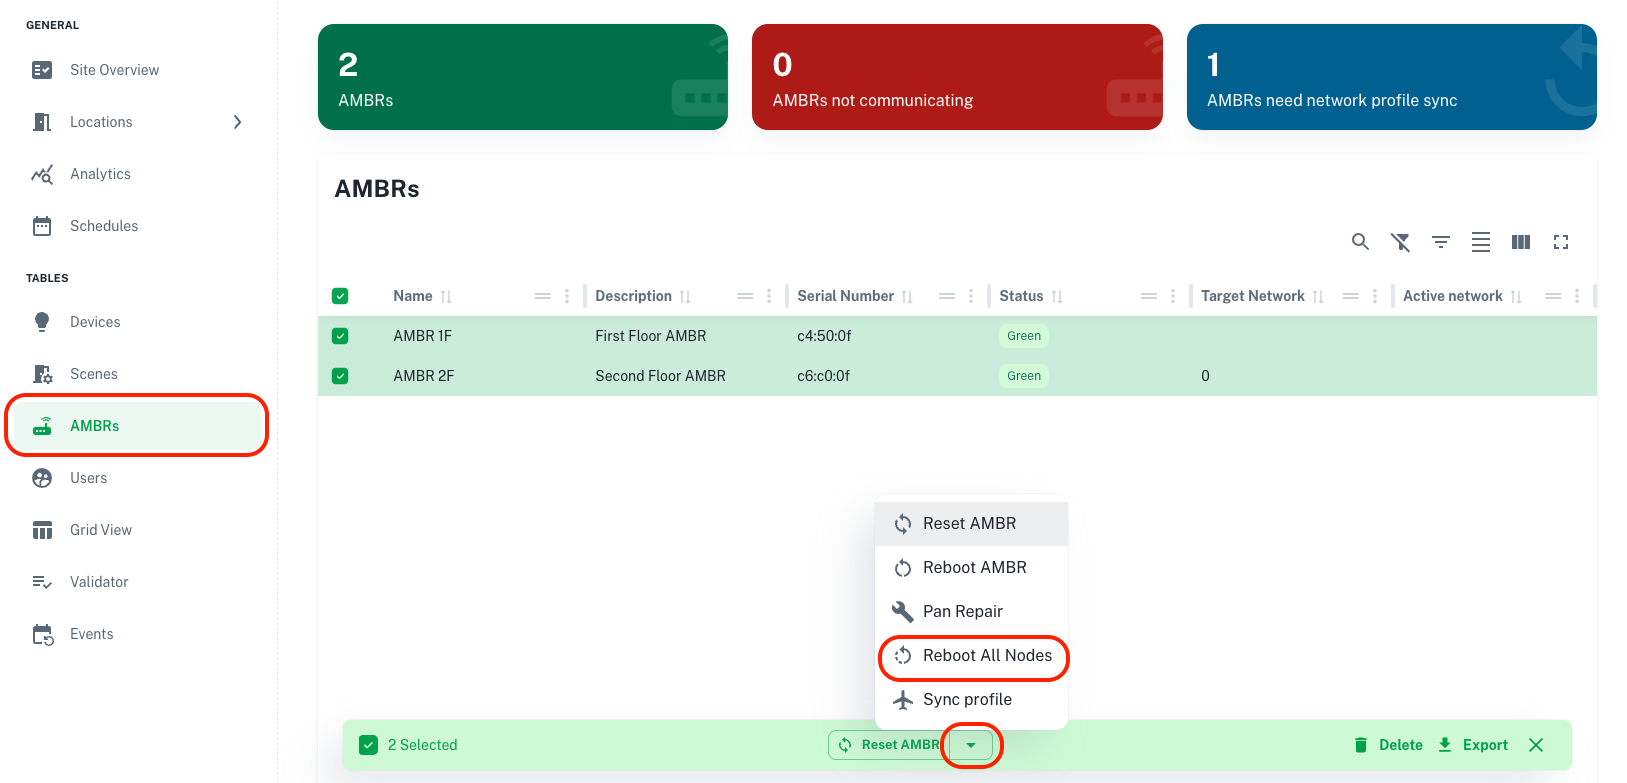
Reboot All Devices#
After all devices have received the command to move to a new network profile, they need to be rebooted. After they reboot, they will be communicating on their new network profile. This is done by going to the AMBR table, selecting all AMBRs, and selecting "Reboot All Nodes" in the action menu at the bottom of the screen.
Step 5: Assigning AMBRs To Profiles#
After the devices have been rebooted, each one should be communicating on the network profile that was assigned to them. This is a crucial phase where the devices transition from the default settings they were shipped with to the specific configurations tailored for your setup. However, the AMBRs themselves will still be on their default profiles at this stage. This is by design, as it allows them to remain in a communicative state with all devices during the initial setup and configuration process. With the devices now operating on their assigned profiles, the next critical step is to align the AMBRs with their respective network profiles.
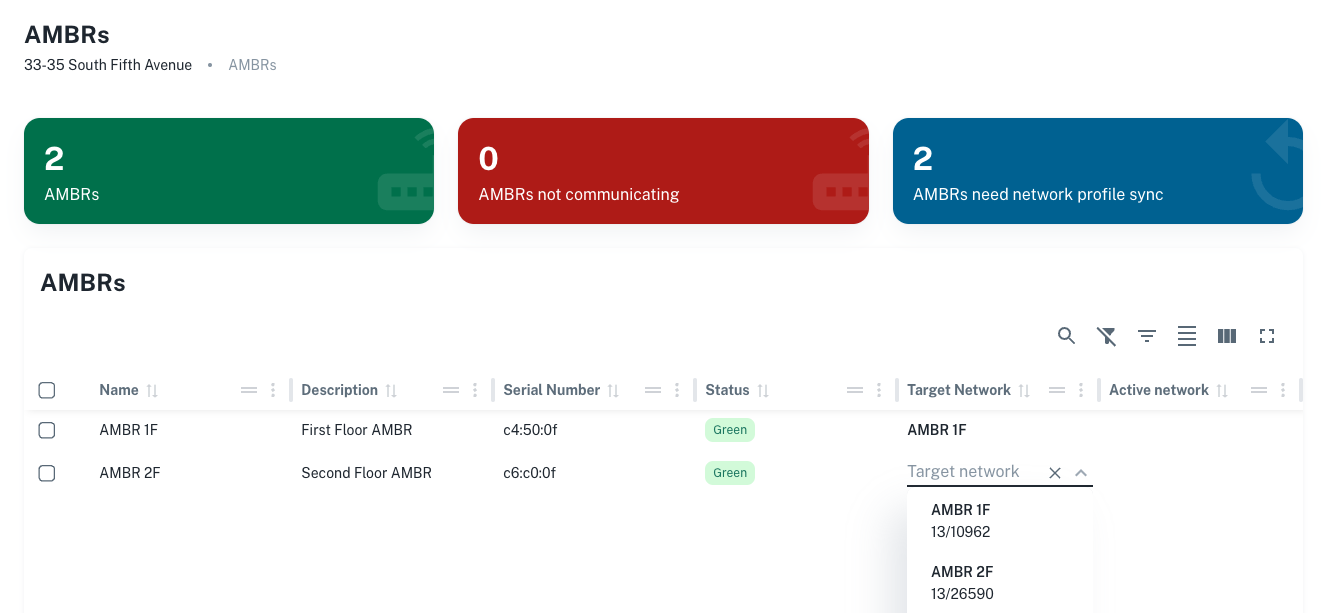
Assign Profiles#
To assign network profiles to the AMBRs, in the AMBR table, simply select the assigned network profile in the "Target Network" column.
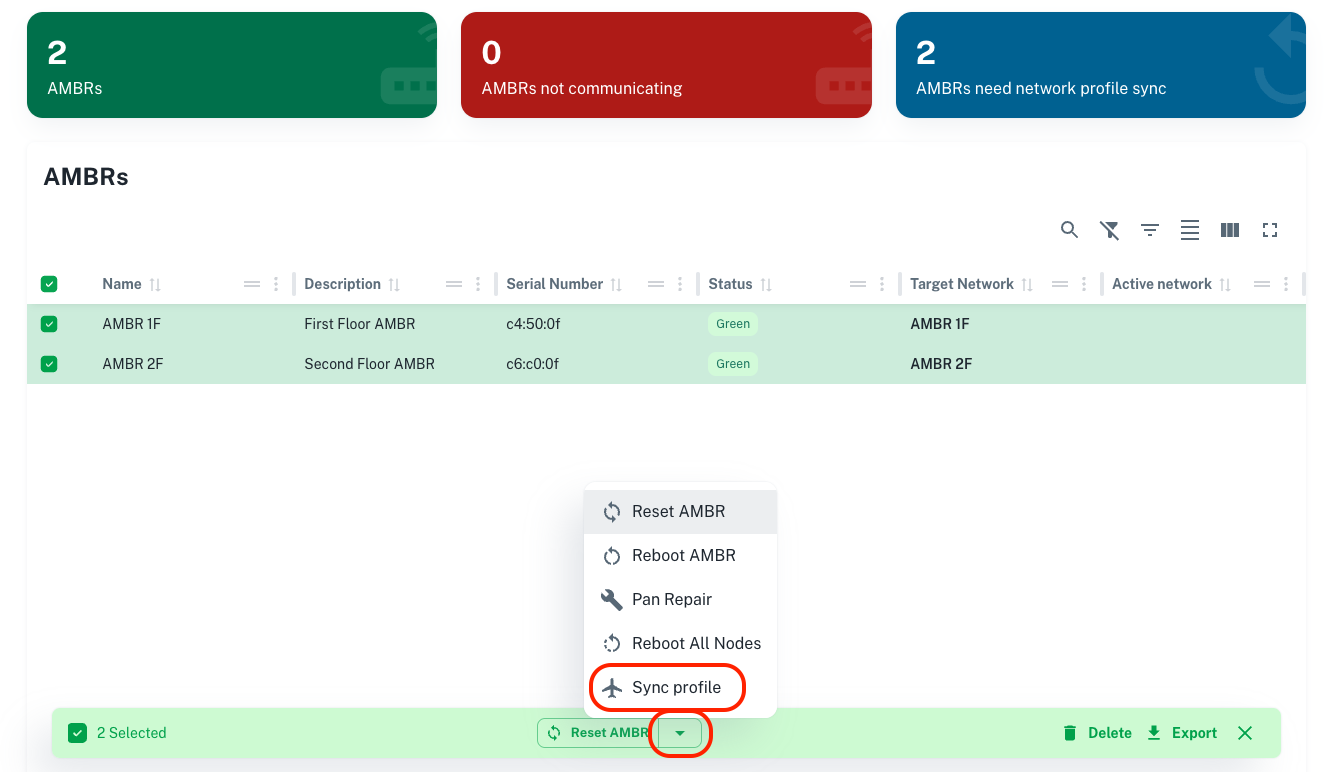
Sync Profiles#
Once all AMBRs have been assigned a network profile, select all the AMBRs, and selecting "Sync Profile" in the action menu at the bottom of the screen.
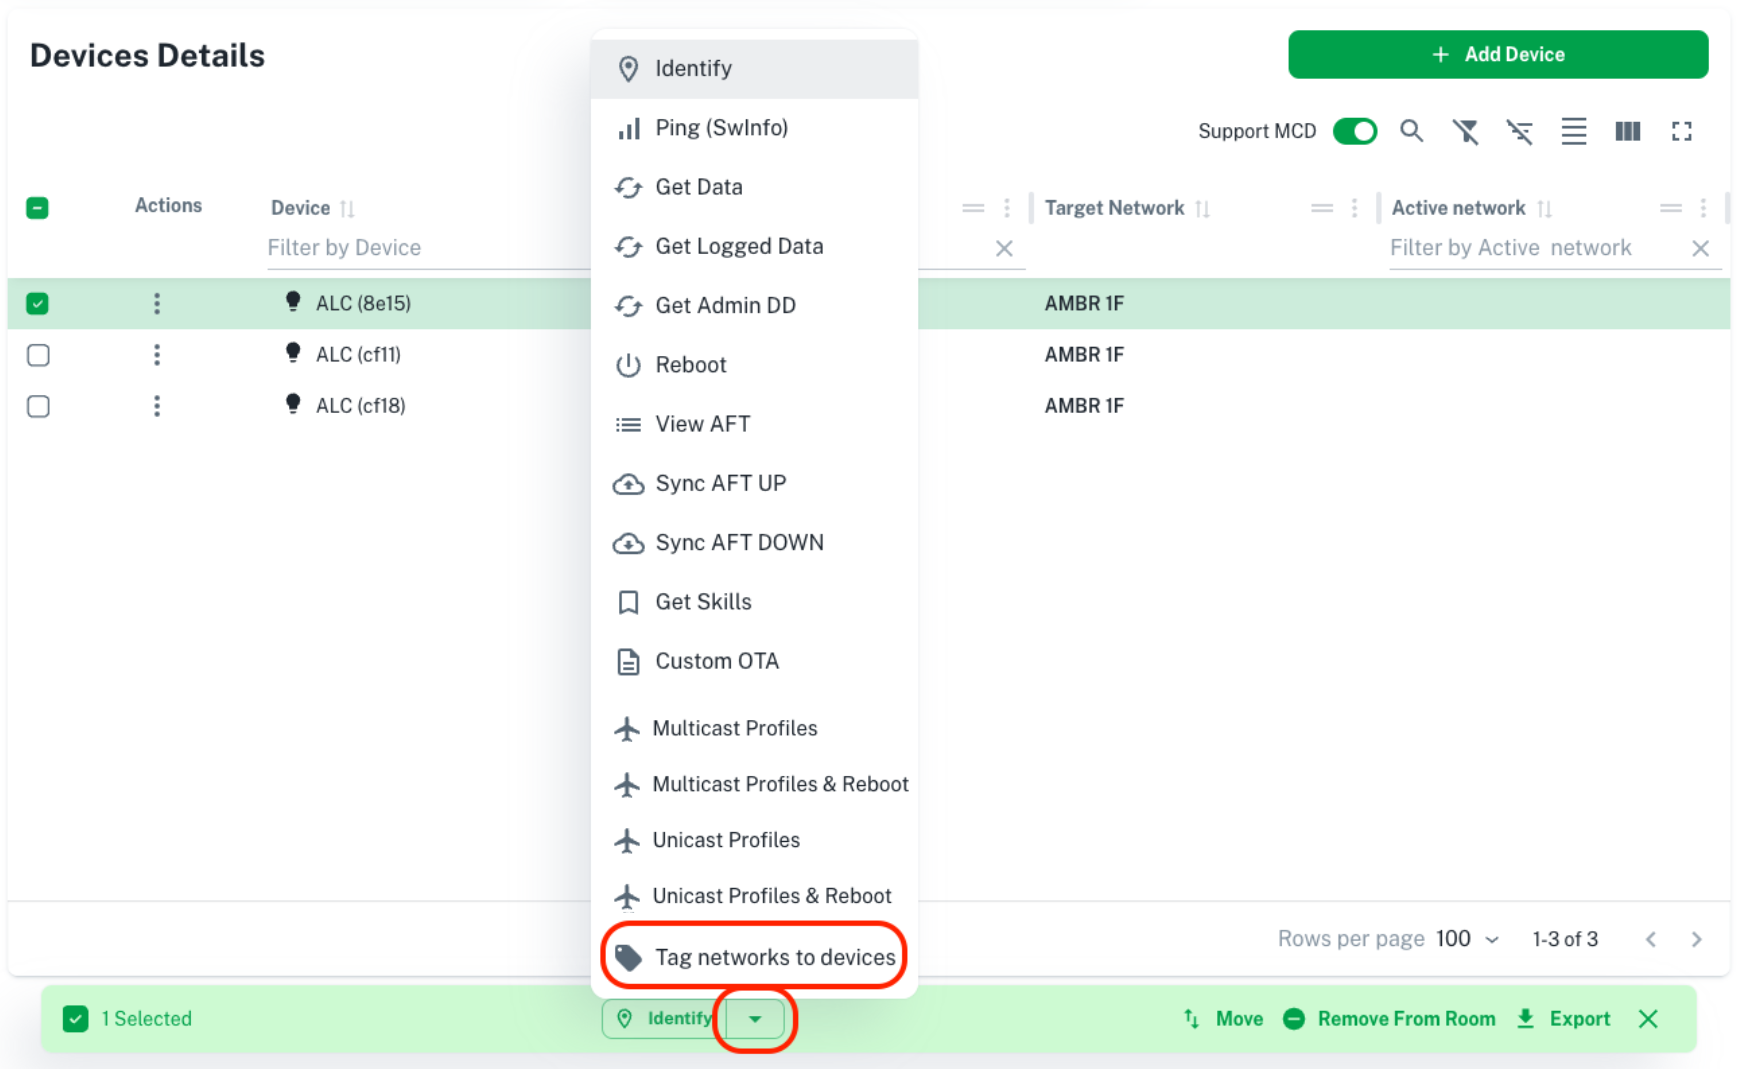
Step 6: Tagging Networks To Devices#
After assigning new profiles and rebooting the devices, they don't automatically display their updated active profile in the configuration app. To reflect the changes accurately in the system and verify that the devices are indeed operating on their assigned profiles, run the "Tag Networks To Devices" command. This action prompts the system to scan and recognize the current active profile of each device.
To do this, in the devices table, select any device, and select "Tag Networks To Devices" in the action menu at the bottom of the screen. It is best to give the AMBRs some time to discover all the devices on their profiles before attempting to tag networks to devices.
After this command is finished running, the response will indicate how many devices' profiles were updated. If the number of devices that updated was less than expected, give the system some time to discover devices, and attempt to tag networks to devices again.
Troubleshooting#
Despite best efforts to synchronize and assign profiles correctly, there may be instances where certain devices do not successfully move to their assigned profiles. In this case, it is necessary to revert AMBRs back to the default profile and attempt to move the device again.
1. Profiles Synced#
After tagging networks to devices, the "Active Profile" column in the devices table will be updated to the active profile. If the "Active Profile" column matches the "Target Profile" column, the "Profiles Synced" column will be "True". If the device is not on the right profile, the "Profiles Synced" column will be "False".
2. Revert AMBRs To Default Profile#
For devices that haven't moved to the correct profile, identify their corresponding AMBRs. Temporarily revert these AMBRs back to the default profile following Step 5 while selecting the default profile. This step ensures that the AMBRs can communicate with the unsynced devices, which are likely still on the default profile.
3. Attempt To Move Devices Again#
With the AMBRs on the default profiles, attempt to move the unsynced devices to their assigned profiles once more. Follow Step 4, using the "Unicast Profiles & Reboot" instead of "Multicast Profiles & Reboot". This command will reboot the device after the move command, and will send back a successful or unsuccessful response.
Unsuccessful Response
An unsuccessful response from a device indicates communication issues. Additional troubleshooting may need to be done to restore communication with the device.
4. Move AMBRs Back To Assigned Profiles#
Return the AMBRs to their assigned profiles following Step 5 while selecting the assigned profiles. Tag networks to devices and check the "Profiles Synced" status. If any devices remain unsynced, repeat the process of reverting AMBRs and re-syncing until the devices move successfully.